


If you’ve been reading this blog for a while, you know I’ve become a little obsessed with cement lately. Or, more specifically, with Henry FeatherFinish Underlayment Patch and Skimcoat.
I bought a 7-pound box of the stuff last fall to spread on some faux pumpkins, and I was so happy with how they looked afterward, I started wondering what other objects I could coat in concrete. The list of things I’ve tried so far includes a tabletop, a pair of junk rabbit ears, a foam wreath and a flocked bird.
I’ve come to the conclusion that pretty much everything looks better encased in concrete.
When I started mixing up a new batch last week, my cat took one look at my container of wet cement and immediately turned tail and ran.
Ha.
She needn’t have worried. I didn’t have anywhere near enough cement to cover a 17-pound feline. Besides, I had other plans for it. I wanted to use it for a jewelry box makeover.

The deconstruction process
How do you turn a 1980s Early American style jewelry box into an industrial apothecary cabinet? You start by stripping all the excess frills and fripparies off.
I removed the skirt on the bottom with a few hammer whacks.

Then I wedged a screwdriver under the Chippendale drawer pulls and pried them off.

Each handle was attached with three tiny nails. Some of them popped out as I was prying. The ones that didn’t I pulled out with a pliers.
I also removed the trim around the drawer edges with a pliers.

Once I had all the extraneous geegaws removed, I sanded the drawer fronts to remove the glue residue and a few stubborn wood shards.

I didn’t worry about puttying the holes or sanding off the finish, as I knew the cement skimcoat I was planning to do would cover everything.

At this point, I decided to give all the pieces a quick coat of grey spray paint. It probably wasn’t necessary, but I thought if any of the wood ended up showing, it would be less noticeable if it was the same color as the concrete.

Applying the cement
Before I started applying the cement, I stuck a piece of masking tape behind each of the holes in the wood. That way, the cement would fill in those spots and not seep through the back.

Here’s the FeatherFinish skimcoat I used:

To mix it, you just add 1 part water to 2 parts powder. Then you spread it on whatever you’re skimcoating like you’re frosting a cake.

I used a putty knife to spread the cement and smooth it out. You want to get the finish as smooth as possible while the cement is wet because once it dries, ridges and rough spots are very noticeable.

The color of the cement lightens up as it dries.

Here’s what the jewelry box looked like after it was dry:

It wasn’t bad, but there were some high spots and ridges that bothered me, so I sanded them down.

Sanding left some parts of the box darker than others, and that bothered me, too, so I mixed up another batch of cement. I made the new batch more watery than the first one and spread it on very thin, using my fingers instead of a putty knife.

Adding the drawer pulls
Happily, when the second coat dried, the surfaces were smoother and more uniform than they had been after the first coat, and I was able to move on to the next step: adding new hardware to the drawer fronts.
I had bought some small card holder drawer pulls from Amazon (they were 3 1/4 inches wide x 1 5/8 inches tall). To attach them, I first measured and marked where I wanted them on each drawer.

Then I drilled holes …

… and screwed the new hardware into place.

Midway through attaching the drawer pulls, it occurred to me that I should apply a topcoat to the concrete. If I’m going to be opening and closing the drawers a lot, the oil on my skin would eventually discolor them unless they had some protection, I reasoned.
I didn’t want to use polyurethane because I thought that would make the concrete shiny. Instead I opted for clear furniture wax. I applied to two coats, buffing each one after it dried.

The wax darkened the concrete a little, but it retained its matte finish.
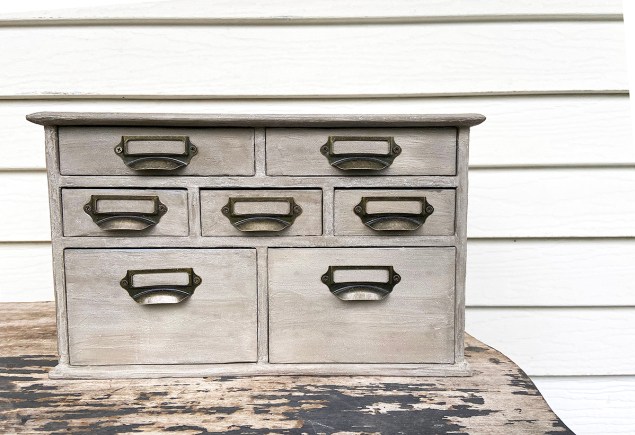
Ta da
After I put the drawers back into the chest, my jewelry box makeover was complete.

I didn’t change a thing about the the interior of the drawers. Isn’t that blue corduroy amazing?

It was almost too pretty to cover up.

But as a collector of random trinkets, gee gaws, and shiny baubles, I am always in need of storage.

I still have to make cards to put inside the drawer pull frames. But I will deal with that another day.

For now, let’s just marvel at how great the cabinet looks.
And remember how different it looked in the beginning.
Almost hard to believe it’s the same cabinet, right?
Sadly, this project pretty much emptied my box of Henry FeatherFinish. I’m a little bummed about that, but I’m sure the cat is relieved. 😂🤣😂
I might buy another box because it’s been fun to work with. If I do, do you have any suggestions for other things I should try using it on? (Inanimate objects only, please.)
— Lisa

love your work!! You inspire!!
Thanks, Karen! 🙂
I have a jewelry box just like this waiting for a makeover. Love how you upcycled yours into an apothecary cabinet! I see you collect heart shaped rocks too. LOL Isn’t the search fun!
Thanks, Marie! And yes, I love hunting for heart-shaped rocks, too. Every time we go on vacation, I try to bring one back. They make the best souvenirs ❤️🖤
Lisa this came out amazing😱 I’d luv to invite you to join us and share over at Charming Homes and Gardens Wednesday – Sundays😁 https://www.dabblinganddecorating.com/single-post/2020/03/31/Charming-Homes-Gardens-Wednesday-Link-Party
What a transformation!! I’m in awe! Thanks for sharing for Charming Homes & Gardens! I’m from Wisconsin too! I live up in Mincoqua!