

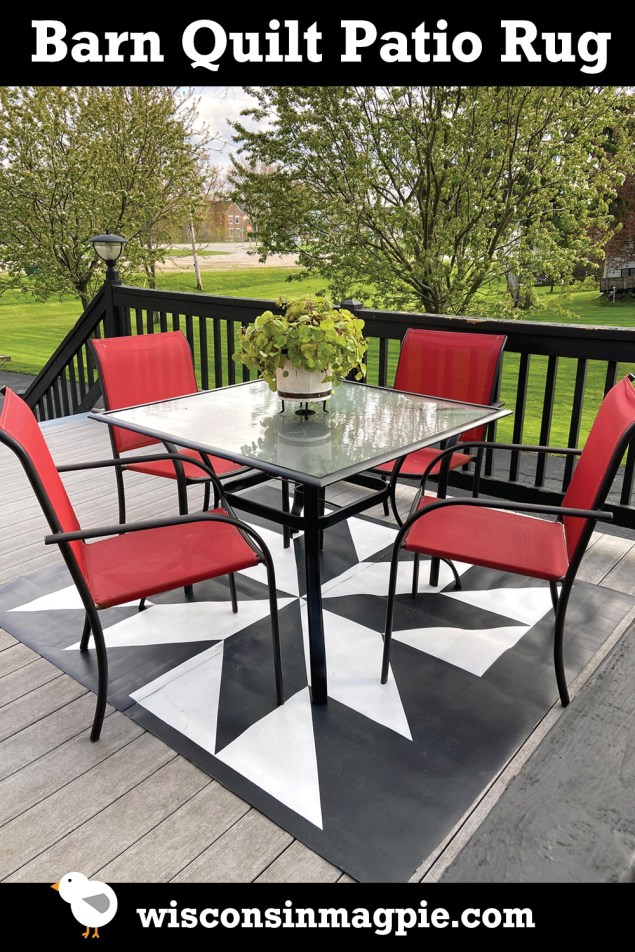
I always wanted to paint a barn quilt, but since I don’t have a barn, I decided to make one for my deck. I’m calling it a “barn quilt patio rug,” because it’s kind of a combination of the two.

Prepping the vinyl
Here’s what I started this project with: a long skinny remnant of vinyl flooring, left over from our upstairs bathroom remodel, circa 1999.

After being rolled up for 20+ years, the vinyl had developed a bad case of the lumps. I had to set a bunch of heavy items on the vinyl in order to weigh them down.

It took a few hours, but eventually the weights did the job, and the vinyl was flat enough that I could work with it.
To start my barn quilt patio rug, I trimmed the uneven ends of the vinyl off. Then I cut the piece in half so I’d have two shorter sections instead of one long runner. The vinyl was surprisingly easy to cut with a scissors.

Next, I washed both sides of the vinyl with hot soapy water. I also used a spray cleaner with bleach in it to remove a few spots of mildew.

Since the front of the vinyl had a shiny, embossed finish, I decided to paint my design on the flat back side.
Pouring on the paint
With the prep work done, I pulled an old can of white Rust-Oleum Chalked paint off my basement shelf to use as the base coat.

Because I had a large flat surface to cover, I poured puddles of paint out onto the vinyl.

Then I spread the puddles with a wide brush. I dipped my brush in water periodically to thin the paint out and make it easier to spread.

The paint did a phenomenal job of covering in just one coat. Below you can see the difference between the vinyl before it was painted (in the front) and after (in the back).

Math and measuring
Once I had both pieces of vinyl painted, I taped them together with a strip of duct tape on the back side. The combined pieces measured 62 inches x 75 inches.

I found the quilt square design that I wanted to use for my rug online, but before I could start painting, I had to do a bit of math and measuring.

After studying the design, I realized it could be broken down into four rows and four columns, for a total of 16 separate squares.
I wanted a 2 1/2- inch border at the end of the short (62 inch) side of the vinyl. Since the border would go on both ends, I needed a total of 5 inches for the border. That left 57 inches. I divided 57 by 4 and came up with 14 1/4 inches for the size of each square.

To transfer the design onto the vinyl, I first measured and marked the center points, both horizontally and vertically, and drew lines across the rug at those points.
Then I measured 14 1/4 inches out from there and drew more lines. And then I measured another 14 1/4 inches out from there and drew another set of lines.
With my basic grid marked out, I drew diagonal lines from corner to corner inside each of the individual squares, using a yardstick as a straight edge.

Painting a barn quilt patio rug
Once I had the entire pattern marked out on the vinyl, I wrote a “B” for “black” onto each shape I needed to paint. Then I laid down some blue painters tape along my pencil lines.

I filled in the taped off squares with some black chalk paint that I had (also Rust-Oleum Chalked brand; technically the color is named “Charcoal.”)

I just kept taping and painting until I had all of the shapes marked with a “B” filled in.

Then I got to do my favorite part: peeling up the tape to reveal crisp straight lines.

Honestly, there is not much in life that is more satisfying than peeling up painter’s tape. (As long as the paint has not bled underneath it.)

This is what my vinyl looked like with the tape all removed:

I liked it. But as this was going to be a rug, I decided maybe so much white wasn’t practical. So I taped off the border and painted it black instead.

I could tell while I was painting it that I was going to like the black border better. It added weight to the rug and grounded the design.

Plus, it just looked more dramatic with the black background.

Finishing touches
After peeling off the border tape, I erased all the pencil marks that were still showing and did a few minor touchups. Then I left the paint cure overnight.

The next morning, I brushed on three coats of Rust-Oleum Chalked Protective Topcoat (matte clear), waiting two hours between each application, per the directions on the can.

The chalk paint and topcoat I used are technically meant for indoor use. You’re probably wondering if they are going to hold up to the elements outdoors. So am I.
I’ll let you know at the end of summer how the rug is looking. Until then, let’s all just think positive thoughts, shall we?

I ended up having to buy a new can of topcoat ($16.95) when my old one ran dry, but other than that, I just used what I had on hand, so the cost of my barn quilt patio rug was really minimal. Even if it falls apart at the end of the season, I’ll have gotten my money’s worth out of it.

Anybody have any experience using Rust-Oleum Chalked paint and topcoat for outdoor projects? Let me know how they held up for you. Unless they deteriorated quickly. In that case, maybe I’m better off not knowing.
— Lisa
I love this, I think you did a great job and what a good way to use a remnant of vinyl flooring.
Thanks, Angela! This was one of those projects where I figured it could go either way — either look great or be a total fail. I was happy it all came together.
This project is AMAZING Lisa! Who knew the underside of flooring could look so charming?!
Thank you! 😊