

Mesh screening is not just for windows anymore, friends. It also works great for handcrafted roses.

In my opinion at least, window screen roses have kind of a cool industrial vibe without looking heavy or clunky.
I originally made the roses to go on the concrete and moss wreath that I blogged about last week. Unfortunately, after I tried adding them to the wreath, I had second thoughts. So the wreath (pictured below) ended up with a concrete bird on it instead, and my window screen roses ended up being this week’s blog project.

Inspiration
The idea of making window screen roses had actually been bumping around in my brain for quite a while, thanks to this small remnant of black screening we had in our basement.

Honestly, the amount that was left on the roll was too small for any window we’d ever have to rescreen, but I hung onto the remnant anyway, because I knew it had crafting potential.
When I finally decided to turn the screening into flowers, I went online for ideas and inspiration. My favorite handmade flowers were the roses that are in this video (starting at about 3:30). I used the video as a starting point, but since I was making my roses out of window screening, not burlap, I had to make a few adjustments.
Making a template
Before I could start making roses, I first had to create a template. I did that by folding a 4-inch-square piece of paper in half three times ….


… and then rounding the outside corners.

When I unfolded the paper, I had an eight-petaled flower.


Cutting the pieces
Once I had my template made, it was time to start cutting the actual pieces for my roses. I tried tracing around the template with a Sharpie marker, but I couldn’t get any color to show up on the black mesh, so I ended up pinning the pattern piece to the screening and cutting around it.
For each flower, I needed four pieces. I folded over my screening so I could cut several pieces at once.

I made five flowers, so I cut 20 of these pieces in total, but the directions I’m giving here are for just a single rose.

Once I had the pieces cut, I cut a slice of pie out of each one, as pictured below. One piece had one slice cut out. One had two slices cut out. One had three slices cut out. And one got cut in half.

Shaping the petals
After I had all of the slices cut, I rolled each one into a cone shape.
For the larger slices, I spread a bit of clear craft glue on one of the end petals …

… and then pulled the glued petal around and overlapped it with the petal on the opposite end.

I ended up with eight different cones of varying sizes.

Next, I snipped off the bottom of each cone, so there was a hole in it.

Then I rolled down the edges of the petals. In the video, they used burlap that had been stiffened with Mod Podge, and they were able to mold the petals pretty easily. Since I was using window screening (and I had not stiffened it with Mod Podge), I had a harder time getting the edges to stay rolled. Ultimately, I ended up having to spread a little clear craft glue on the edge of each petal ….

… and roll it down around the barrel of a small paintbrush.

I had to hold the paintbrush in place for a bit (maybe 30-60 seconds), until the glue started to set up.
When I removed the paintbrush, the edge would retain a slight curl.

Rolling the edges was kind of a pain, but it was definitely worth doing. The curl made the petals look more organic and natural, like those on a real rose.

Assembling the flower
To assemble the flower, I started with the smallest cone and inserted it into the second smallest, securing it with a dab of glue.

Then I insert the two nested cones into the third smallest cone …

… and so on and so on.
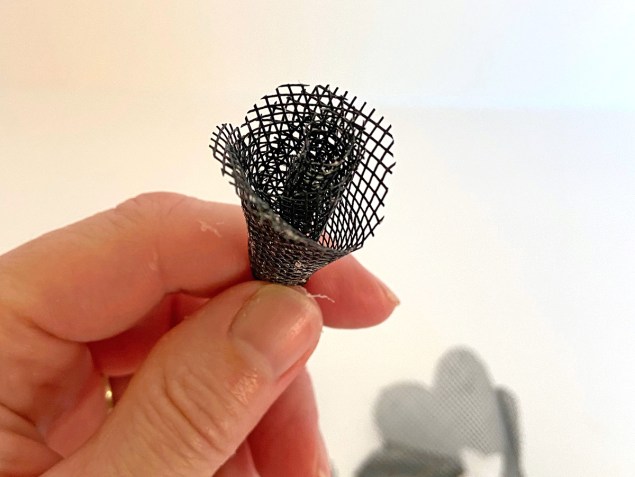
The first few layers of cones didn’t look very impressive, but as I got further along, I could see the flower starting to take shape.

I made small adjustments here and there as I assembled the pieces — trimming a little more off of some of the bottoms, recurling some of the petals, etc. In the end, all the pieces fit together to make a beautiful rose.

The biggest problem I had making these was with the glue. I used a clear craft glue, so in theory it shouldn’t show on the flowers, but I found that if I laid it on too thick, a crusty film would form over the mesh. So I was constantly struggling to find the right balance: using enough glue to hold the screening in place but not too much that it formed a heavy crust.

Building a bouquet
As I mentioned earlier, my original plan was to attach the flowers to a wreath I was making. When I decided that wasn’t going to work, my window screen roses didn’t have a home.
As I racked my brain for ideas on what to do with them, I remembered the collection of old wooden spools that I had displayed in a vase. The spools always reminded me of a bouquet, even though they weren’t flowers.
When I pulled the vase off the shelf to look it over, it occurred to me that I could just plop the roses into the holes on the tops of the spools.
Ta da. Now the spools are stems for the roses.
I considered gluing the roses in place, but I think they’re stable enough without it, and this way the flowers are easy to remove if I ever get tired of them or find somewhere else to put them.

I made a video that gives a quick overview of my window screen roses. If only the actual process of making them was as quick as the video.
And here’s a photo to pin if you’re a Pinterest user:

— Lisa
Visiting from Funky Junk and I had to pop over for a closer look. What a great idea and I just love the rustic charm of these! Thanks for the great tutorial too. Pinned
Thanks, Marie. 🙂
Flat out genius! Industrial and vintage all in one! I’ll certainly be looking at screens differently now!
I’ve featured this beauty on this weekend’s DIY Salvaged Junk Projects 526. Thanks for linking up!
Thank you so much!
I love these roses. What a great idea. I have some screen left over from repairing a window. Now I know what to do with it.
Thanks for the idea. .
Bev
Thanks, Bev. 🙂
What a cute way to make roses! I love these very much! Your instructions are very easy to follow and that’s a plus! I’m going to try this but I’m going to try to find a way to roll those petals without glue…hmmmm. I know these had to be time consuming but that’s ok too, I will probably do them a little at a time. Thank you for this inspiration!
If your screen is more of a wire mesh, you could probably bend the petals and get them to stay in that position without glue. Good luck!