

I turned a 50-cent garage sale purchase into a cute little DIY Halloween sign this week.

Here’s what the sign looked like when I brought it home earlier this summer:

I didn’t have any use for a “Welcome to the World” sign, but I liked its rustic frame — and its price — so I bought it, with a plan to make it over at some point.
That point came this week, when I started thinking ahead to Halloween and decided I wanted to paint a witch hat silhouette on the sign.
Starting with a blank slate
To start the makeover, I gave the sign a black base coat with my current go-to paint: Rust-Oleum Chalked in charcoal.

It took a few coats to cover the words. When I finally had a blank slate, I went to my computer and traced a witch’s hat in Photoshop, giving it a few extra zigs and zags to make it interesting.

Then I spent waaaay too long obsessing about what words to write on the hat. I wanted to use a quote that straddled the line of being spooky without being creepy. (Or at least not so creepy that my husband would be sleeping with one eye open after he read what I wrote.)

I ultimately settled on “Something wicked this way comes” from “Macbeth,” by process of elimination. I’d already used that line on a previous Halloween sign and I really didn’t want to repeat it on this one, but every other idea I came up with was either too dark or too cutesy, so “Something wicked” it was.
I used the font Trattatello and angled the words on the hat so “wicked” bled off both edges. Then I printed the design out on my home printer.
Transferring the design

My sign measured 15″ x 15″, so the design tiled out onto four letter-sized pages that I had to trim and tape together. (Technically, it tiled out onto six pages, but two of the outside ones were almost entirely black, so I didn’t need them.)

To transfer the design to the black sign blank, I used a sheet of white tracing paper.

I don’t know if they still make tracing paper like this. I bought mine secondhand, and I have to say I love it. I would love a Cricut even more, but the tracing paper is in my budget. A Cricut isn’t.

The tracing paper is a big improvement over my old method for design transfers: rubbing chalk (or pencil) all over the back of a design and then tracing it.
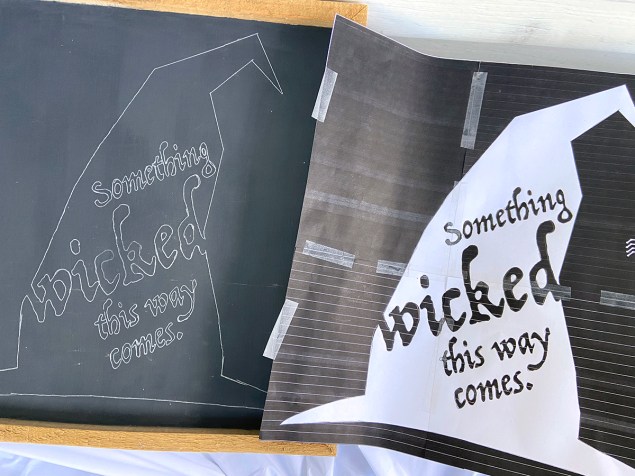
You can see above what a great job the tracing paper did at transferring the design. The lines are all dark and crisp. If I’d used chalk, the lines would have been smudgy, and there would be chalk dust everywhere.
Painting the DIY Halloween sign

With the outlines drawn (except for the spider and spider web, which I somehow managed to forget and had to add in later), I started painting. The painting is always the most time consuming part of making one of these signs. It’s like doing a paint by numbers except that every number is “white.”

I used a tiny brush to go around the letters and in the tight spaces …

.. and a bigger brush to fill in the wide open areas.

I had to paint two or three coats of white to get full coverage over the black.
Finishing touches

When I was done, I let the paint dry for a few hours. Then I coated the entire sign with some clear furniture wax.

Once the wax was dry (in about 10 minutes), I buffed it with a clean, lint-free rag, and my sign was done.

It’s kind of cute, right?
If you have any great ideas for other spooky-but-not-creepy Halloween quotes, let me know in the comments below. I need ideas!
— Lisa
There are so many good quotes. One ominous threat that always put the fear in me as a child is
“I’ll get you my pretty, and your little dog too!” Imagine, someone who would harm little Toto.
Ooh, that’s a good one. I never thought of The Wizard of Oz. For some reason, I had Edgar Allen Poe on my brain when I started thinking of spooky sayings, but as I read through his poems, I realized none of them were going to work. I had forgotten how truly macabre his stuff was.