

Regular readers of this blog know that my general color palette includes just two hues: black and white.

https://wisconsinmagpie.com/2019/06/20/painting-a-fourth-of-july-statue-of-liberty-sign/ 
https://wisconsinmagpie.com/2020/05/12/barn-quilt-patio-rug-from-vinyl-flooring/ 
https://wisconsinmagpie.com/2018/04/13/crafting-newspaper-chicks-wreath/ 
https://wisconsinmagpie.com/2020/05/29/chalk-paint-on-fabric-fourth-of-july-dishtowels/ 
https://wisconsinmagpie.com/2020/06/06/vintage-inspired-painted-lampshade/
Occasionally, I go a little crazy and use grey.
But, honestly, that’s about as spicy as things get around here. Or at least it was.
I crossed over to wild side last week when I gave this old secretary desk a makeover.

It ended up looking like this:

I’m not sure how it happened, folks.
One minute I was in the paint department at Menards, idly leafing through chips and swatches, as one does while waiting for one’s husband to do whatever it is one’s husband does in the lumber department. And the next thing I knew I was the proud owner of a tester pot full of Nautica at Home’s Nantucket Green.
It’s like my brain short circuited and completely bypassed all the usual steps of dithering, self-doubt, procrastination, and second guessing.

That’s 7.12 fluid ounces of sheer madness, friends.
But I don’t regret it. (At least not yet.)
I’d like to point out, though, that the green looks a bit limier in the photos than it does in real life. In person, the green leans more olive. (For a more accurate look at the color, check it out the Pittsburg Paints website.)

Off with the pediment
How I got from a tester pot of crazy to a full-on made-over chalk painted secretary desk is another tale of questionable decisions that I also surprisingly do not regret. (At least not yet.)
Questionable Decision No. 1 involved removing the pediment from the top of the piece.

My husband was having fits as he watched me whack away at the arches with a hammer — and not (just) because of my subpar deconstruction technique.
He, apparently, is a furniture purist. And I, apparently, am not. Or at least, not in this particular instance.

Frankly, the pediment and finial were a bit too fussy and formal for me. I don’t need my furniture putting on airs.
Plus, I knew if I whacked off all the floofy stuff up there, I’d open up 1.68 square feet of pure, unadulterated decorating real estate. And as a lifelong collector of kitsch and castoffs, I value every square inch of flat expanse that can be used for storage and display purposes.

Ahhh. So much better. Right?
Questionable Decision No. 2
You might notice in the photo above that in addition to removing the pediment, I also removed the fretwork from the glass doors, which is Questionable Decision No. 2.
I actually liked how the fretwork looked, but it was only intact in one door when I bought the piece. So I either had to re-create it in the second door or remove it from the first one. And as my fretwork removal skills (though minimal) are significantly greater than my fretwork re-creation skills, I opted for the former.
Next, I added wood filler to a few spots where the veneer was chipped.

Then I sanded the entire piece to give the wood a little tooth before painting.

Interior dilemmas
I decided to paint the interior of the cabinet first, as I wanted the inside to be a different color than the outside.

I used the spray version of Rust-Oleum Chalked paint in Linen White to get into all the nooks and crannies in the desk. Then I used the brush-on variety of the paint everywhere else. It took three coats of white to cover the dark wood.

The photo above is after the first coat, while I was still struggling to figure out exactly which boards should be white and which ones should be green. I knew in general I wanted the inside to be white, but what about the pieces at the top and bottom of the hutch which extended beyond the interior? And what about the inside of the doors? And the shelves?
Finally, I was back inside my comfort zone, wallowing in dithering and self-doubt. I painted and repainted different boards several times before I finally settled on a scheme I was happy with. (At least for now.)

Celery green primer
I was planning to turn my little tester pot of Nantucket Green latex into chalk paint, but while I was digging through my basement stash for the plaster of Paris I needed to accomplish that, I discovered a half gallon of a celery green primer left over from our living room remodel a decade ago. The primer was probably past its prime, but it hadn’t hardened or gone rancid, so I decided to use it as a base coat for the exterior.
Chalk paint doesn’t really need a primer, but my hope was that the celery green would be easier to cover than the dark wood, and that that would allow me to stretch my little tester pot of paint so I wouldn’t run out mid-project.

In the end, I’m not sure if it made a difference coverage-wise, but I used up the primer, so at least now I have one less can of paint in my basement.
From latex to chalk paint
To turn my latex paint into chalk paint, I dumped some plaster of Paris into a plastic container and mixed a little water in with it to create a paste.

Then I dumped the paint into the paste and stirred. I tried to use about three parts paint to one part plaster, but it’s not rocket science. I generally just eyeball the amounts as I mix them, and the paint always turns out.

It’s important when you’re working with homemade chalk paint to keep stirring as you’re painting. If you don’t stir often, the plaster will settle on the bottom of your container.

It took a couple of coats of the chalk paint to cover the primer.
I was working on this project off and on for a few days, and eventually a lump of hardened plaster formed on the bottom of my container. Obviously, I’d let the paint sit too long without stirring. I ended up having to buy a second tester pot of Nantucket Green and mix a new batch of chalk paint to complete the job.
When I was done painting, I finished the piece off with a couple of coats of clear Behr furniture wax.

The completed chalk painted secretary desk
Overall I’m pretty happy with how my chalk painted secretary desk turned out. The best part is all the shelf space I have to decorate now. And how all of my collectibles pop against the white background.

Since I finished the project before the Fourth of July, I used some of the space to display my small (but growing) collection of miniature Statues of Liberty.

I bought one of them at a gift shop on Liberty Island when we were in New York last summer. The rest are all secondhand finds.
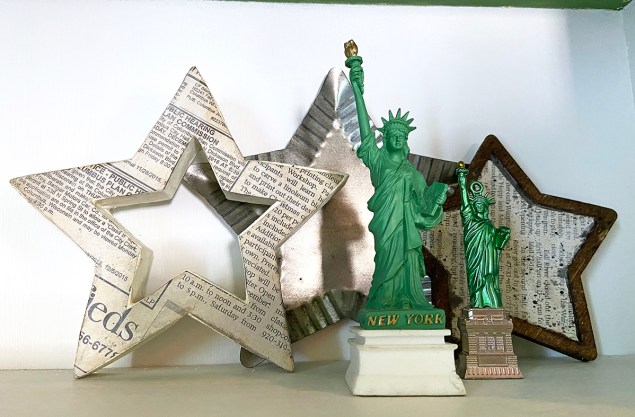
I added a few of my vintage spools, because one of them had turquoise paint on the ends that matched a couple of my statues.

I grabbed this little Scotch moss plant off my porch. I’m not sure if it will grow indoors, so if it starts to droop, it might have to go back outside, but for now I love how it brings a little life to the cabinet.

All in all, I like the green. But if I have painter’s remorse in the future, it should be easy enough to cover it with my fallback black. The white interior is definitely staying, though. It brightens the cabinet up so much.

So what do you think? Do you like the green? Are you pro-pediment or anti-pediment? And when you’re at Menards, do you hang out in the paint department or the lumber department?
— Lisa
I have to admit, I cringed a little when you said you removed the pediment. But looking at the before and after photos, I agree with your decision! The cabinet looks so much less fussy! I love it!
I agree with your choice to remove the pediment and filigree. The green is a bold colour and looks terrific.
The only thing I like better than your work is your writing about your work.
Love it all – you rocked that green & it most likely makes you happy every time you see it. As a black & white girl myself, I can totally relate.
Keep the posts & projects coming!
Thanks Diane. Sometimes I get a little carried away as I’m stringing words together. Glad you appreciate my point of view. 🙂
Just came across your blog and I love everything I’ve seen so far! This piece turned out magnificently… every decision you made was right on the money! Thank you for the inspiration 🙂
Thanks, Rachael! Glad you and I see eye to eye. Now if only we could convince my husband…
I love reading your stories. They are so entertaining and the products you create are amazing. I too am a black and white lover but the leaps of faith are fun to see.
I have exact Secretary desk and am also painting it, but will leave the the pediment and finial. Don’t think leaving the pediment & finial make the piece “fussy” I feel it gives the desk a finished elevated look and adds to its beauty. I prefer to keep the pediment & finial as it will remain in my living area . But if it’s going in a kitchen and your going for a simpler utilitarian look then definitely pediment & finial not needed. I am also adding an addition color by way of a small pin stripe inside the desk and at very top of finial.
I grew up with this exact piece of furniture. It’s been in storage for a few years, now I’m ready to use it in my home. I going with black paint and gold hardware. This was never my style of furniture but my mom loved it. I always thought that it was a little to grand for me but by painting it, I will make it my own. No airs here. Lol