

Welcome fall into your home with a simple DIY acorn wreath.

I made mine for free, using acorns that I had picked up off the ground and a few other materials I already had at home.
Materials and supplies for DIY acorn wreath

If you’d like to make a similar wreath, you’ll need the following:
- A big bowl of acorns*
- Drill and drill bits
- Sturdy wire
- Masking tape
- Jute twine
*Before you start this project, make sure your acorns are slug-free by baking them at 200 degrees (Fahrenheit) for a couple hours. (For more detailed instructions on prepping acorns, check out this post by Amanda at Life at Cloverhill.)
Drill the holes
The first thing you’ll have to do to make this wreath is to drill holes. Lots of holes. I used 60 acorns on my wreath, so that meant drilling 60 holes. My acorns were freakishly flat, though. If you have normal shaped acorns, you could get by with a lot fewer.
I used the back of an old sign to protect my work surface while drilling. The sign happened to have a long narrow strip hollowed out to act as a hanger, and that hollowed out area worked perfectly to hold the bottom of the acorns in place while I drilled through the top.

Be aware that acorns are prone to split or shatter during the drilling process, so you’ll want to work carefully.
To prevent splitting, I started drilling with the smallest bit I had — 1/16. Then I enlarged the hole with a slightly larger bit — 5/64. And finally I drilled with a 3/32 bit to get the hole big enough for my wire to slide through.

Despite all my care, I still had quite a few acorns that cracked or disintegrated during the process. Here’s my reject pile:

Moral of the story: If you’re planning to make your own DIY acorn wreath, make sure you have lots of extra acorns on hand.
Cutting the wire
Once I had the holes all drilled, I cut my wire. I wanted my finished wreath to be about 12 inches in diameter so I loosely bent the wire into a circle that size and clipped it with a wire cutters.

Sorry, I’m not sure what gauge of wire I used. I pulled it off a peg in my husband’s workshop, and it wasn’t labeled. But it’s important to use a big, beefy wire for this project because you want it to hold its shape after all the acorns are weighing it down.
Adding the acorns
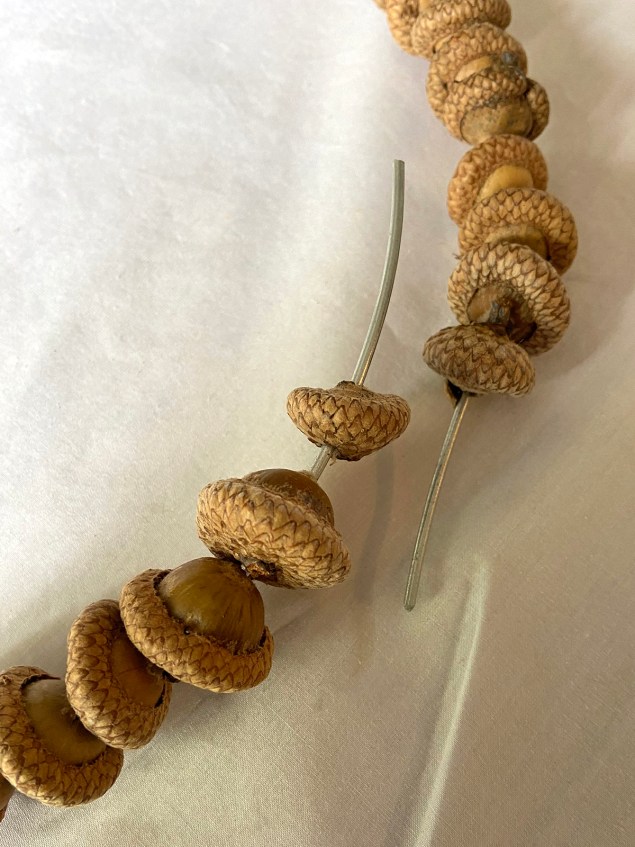
Next, I started feeding the acorns onto the wire one at a time.

This was the most fun part of the process because it went really quickly and I could literally see the wreath taking shape before my eyes.

I kept adjusting the wire as I added more acorns to try to curve it into a nice rounded wreath shape.

Finishing the DIY acorn wreath
When I had all the acorns strung onto my DIY acorn wreath, I trimmed off a few inches of excess wire and overlapped the two ends.
Then I took a long strip of masking tape and wound it around the ends of the wire multiple times.

Here’s what my wreath looked like at this point:

To disguise the tape, I found some jute twine …

… and wound it over top of the tape, securing the end of it with a dab of clear craft glue.

I hung the wreath from a loop of wide burlap ribbon that I had.

I positioned the ribbon so it covered the jute twine, so no one will ever know that that section of the wreath is acorn-less.

Zhuzhing it up
I thought the wreath needed a little something extra to zhuzh it up at that point, so I went outside and picked up a few leaves to hang from the top.

I think it turned out pretty well.
What do you think? Let me know in the comments below. And if there are any acorn experts out there who can explain why my acorns are so oddly shaped, please share! I tried Googling it, but I came up empty. 🐿️
If you liked this project, you might also enjoy reading about the acorn garland I made a couple weeks ago.
— Lisa
Love this craft, simple but effective.
Your wreath is gorgeous in it’s simplicity! Thank you so much for sharing it with us at Farmhouse Friday!
Lisa, I love your wreath. I love upcycle projects and you’ve just given a new lease of life to these darling acorns. Thank you for linking with us at Meraki Link Party.
Naush